Callie Fink aka Elvis882 on deviantART - my online art profile/gallery
My first blog entry! Woooo exciting! :p
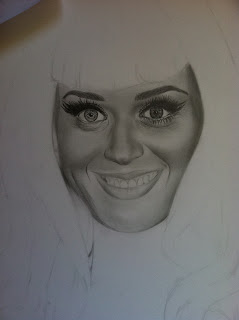
I did this drawing of Katy Perry(Yes I know her eyes are a bit creeper-ish... but that's not the point!) during summer because I wanted to practice drawing detailed skin! It was quite the challenge - my pencil kept on smudging the pores of the skin and I ended up having to redo it like a million times in the end to make it look "alive"... I probably went over the entire face with a kleenex, eraser and more graphite more times than I can count on both hands. Honestly though, the effort was worth it in the end, the high technicality and challenge that this drawing offered me was a chance I am glad I took, and the results came out pretty good in my opinion. There is always room for more improvement - and I took a big step here trying to accomplish an extremely detailed piece. I hope you enjoy the drawing process shots of it, many people were asking if I could post the sequence of the pictures and how i drew it, so here you are.

SKETCHYTIME! -.- It took super long to do it, but you have to make it perfect because its the backbone of your entire artwork. Its so time consuming but so beneficial in the end to get a good, proportional sketch! Taking that extra few hours really makes such a difference; patience is key.
I started in a rough shading with my pencil. I used HB lead for the majority of this drawing. The face was completely HB pencil lead. I just started blocking in the shading really roughly and would go on to smooth it out later. I guess I use a combination of crosshatching and just mindless scribbling.
SO i started on the eye a bit earlier than I would have liked, but then again I love drawing eyes first so I couldn't resist. Dem big fluffy eyelashes!
And now a farther view of the rough-ness of the face.
And another close up, I finished the eyelashes here; they are not perfect and I would go back later to fix them up and refine them a bit more. Oh joy... I used a dark layer of HB and then on top of it I put some 6B here for the eyelashes.
I darkened a bit of the face. Still haven't really blended any at all with tissues. That's the next step.
1 layer of blended graphite on the face.
Details added to the eye, eyebrow, and the wrinkles of the skin underneath. I dont go in and add white pores/shine on the skin until after it is all blocked out with the graphite.
Starting to shade and repeatedly blend more layers of shadowing.
Added a bit more to the left eye.
Almost done with the eye, and the shading is getting gradually darker for the face. Sooooo many layers...
Smoothed out more and it is slowly starting to achieve a more realistic look.
Shaded in the lips and took my Faber Castell Perfection(Cut eraser pencil) and started adding in the individual skin pores.
Starting the bangs. Many people ask how I draw hair... I start with the most basic lines in the darkest parts and build up on top of those. It's really a simple, yet time consuming method - but it works very well for the end effect.
Adding more hairs on top of what I originally drew, only on the darkest parts though.
The face is basically done, the shading completed and the lips darkened. You can see the individual skin pores here. It took so much time. @___@
Working on the hair. Has not been blended yet.
Time to add some good 'ol 6B pencil to the hair. I start just drawing super super dark and pressing really hard on the pencil to get it this dark. Its all a matter of layering. It's a very easy but time consuming part even if you are experienced with drawing hair simply for the fact that there is just so much of it and it goes in many different directions - its just all a flowing mess of individual strands trying to make sense of itself on your paper.
Darkening the hair.
...And more.
Hair almost done.
Finished hair, now to add the tiny details on the dress. I used my Faber Castell Perfection to add the individual strands on the black hair. SO MUCH WORK! -.-
Close up of how the shirt was drawn. Lots of little tiny details but it makes the picture come to life!

VVV See the finished drawing here close up! VVV
And the drawing is finished! As you can see I added a bit of white ink(Dr. Ph Martin's) to the skin, eyes, and face to make it "shine" and I really liked the effect it conveyed - I highly recommend adding that as a finishing touch after everything else is done because it adds a little "push" to the picture to make it truly seem real.
~Callie Fink


Your portraits are flawless, as is your expert use of graphite. But as one artist to another, I challenge you to use graphite and not smudge. If you choose to further your study in art at a school (specifically an art school or otherwise), your professors will ban the use of smudging when it comes to graphite. Mastering the same kind of finish in your work without smudging (and also without a mechanical pencil) will just make you more of a force and gain more renown.
ReplyDeleteYou are so talented artistically and in using social media to get you art out there. Way to go. When you are rich and famous, I'll be able to say I knew her when... Keep up the great work.
ReplyDelete